To search text press: Ctrl F (windows) or Command F (Mac).
Registering,
Loading the app onto your device
Entering data
Uploading records from your device
Accessing your data
Templates
Table of contents / Headings
Maps
Raw data
Data - don't lose it
Dynamic fields
Reports
Exporting
Exporting via API
PDF not exporting
Any unanswered questions, feedback or suggestions please email us at
admin@proofsafe.com.au
Registering
ProofDocs is a collaboration which integrates the data collected with the ProofSafe app into this desktop application 'ProofSafe - Docs'.
ProofSafe is an app for mobile devices such as phones or tablets. ProofSafe provides the forms where you enter your tree data whilst out in the field; collect GPS locations, images, notes etc. Together, ProofSafe and ProofSafe-Docs, are used to create arborist reports.
You will need to register an account for both ProofSafe-Docs and ProofSafe, keep your login and password details for both.
Register with ProofSafe-Docs here on this site, follow the prompts.
Register with ProofSafe from your phone or tablet once you've downloaded the app.
Any issues or questions
contact us immediately.
Loading the ProofSafe app onto your phone or tablet
- Go to the Apple 'App Store' or the Android 'Play Store' on your device and search 'Proofsafe' digital forms.
- Load the app
- Register from the app
Entering data
If you are having problems with the ProofSafe app on your mobile device please contact
support at ProofSafe. There is a feedback button on the app however this will may not trigger a response immediately so please email or call for a faster response.
Uploading records from your device
Once you have collected your data and completed your form you then need to upload. Click on the form name (not the + button) and you will see a list of records, click the black up-arrow, once the file is successfully uploaded the arrow will turn green. If you experience issues uploading your data from your device to the server this is usually related to your network access, you will need to be in range of Wifi or 3G, if it's a large file with lots of images we strongly suggest Wifi.
Accessing your data in ProofSafe-Docs
If you can't find your report data in ProofSafe-Docs it is likely you have entered your email incorrectly into the question 'Arborist email'. This question is the key between your accounts and if the email entered does not exactly match your ProofDocs registered email then you will not be able to view the data. To correct the issue re-open the form, correct your email and upload again.
Using Templates
A template is a formatted document that provides the basis for your reports, it provides all the standard headings, structure and repeated content such as disclaimers and appendices.
In ProofDocs there are a range of Templates, you can use, edit and save these or create your own.
The advantage of the dynamic templates in ProofDocs is that your collected data is instantly inserted into whichever template you choose. So you create your perfect tree risk assessment template (or use the ProofDocs template), then each time you collect data it is simply dropped into the right position. For example the site address can be inserted into your report in 3 places; front cover, introduction and summary without you having to type it.
The key information inserted is your
tree data, once collected in the field using the ProofSafe app, you upload and it arrives in your template. You then choose the fields to keep and the table layout.
Table of contents (TOC) & Headings
To create a heading: type the name of your header such as 'Heritage Tree' then highlight the words and from the editing toolbox choose the level of heading E.g. 'Heading 2' using the second text option box.
When you go back up into the Table Of Contents (TOC) box and hit 'Update TOC' the numbering will be added to your new header and the heading numbering will be automatically put in order for all your headings.
ProofDocs has three options for tables, your data is inserted into any table you have in your template and you simply choose which suits your reports:
Table 1.
Standard table with columns and rows - this is ideal for large tree surveys, lots of data with minimal notes or recommendations. This table allows a lot of data to be displayed, photos would be collated elsewhere in the report.
For this, and Table 3 below, it's best if you change orientation to landscape once you export to MS Word.
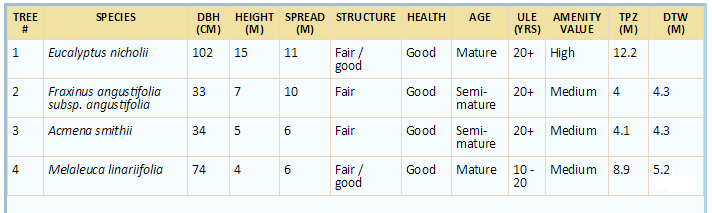
Table 1 - suited to large tree survey reports
Table 2.
Table with images - this table is suited to smaller reports of about 1 to 15 trees, it provides all the information for each tree in one place making it reader friendly. Data down the left, image to the right and extended notes below.
In ProofDocs this table will be stretched when there are 2 images, this formatting is easily fixed once you have exported your report to MS Word.
Usually you will fit two trees to an A4 page in this format.
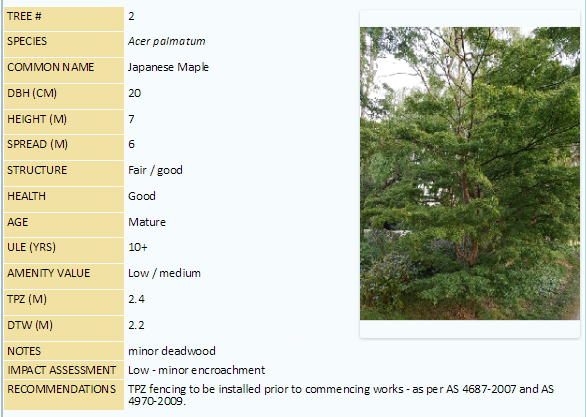
Table 2 - with notes and image.
Table 3.
Table 3 is similar to type 1 with the addition of full rows for more detailed notes, suited to larger jobs where more detail is required. As with Table 1 the images for this type of report would be grouped in a different section of the report.
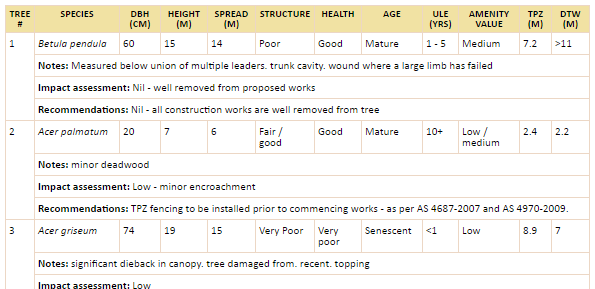
Table 3
Choosing fields to display
Within any table you can choose the fields you want to display, some reports you may want TPZ but not SRZ, other reports you may want amenity value but not retention value. The fields are selected by clicking the edit tab at the top of the table, this opens the selection tool, then you drag and drop, any field in any order.
Using tables - summary
- Choose the tables you want for the given job
- Create various templates with your preferred tables
- Click in the yellow heading to choose which fields you want, and where, within each table
- After exporting to Word create 'sections' then change from Portrait to Landscape for Tables 1 & 3.
- Any other formatting adjustments can be made after exporting your report to MS Word.
A map with the individual trees pinned over a Google map can be automatically inserted within your report. If your report has a relatively small number of trees 1 - 20 then you will probably only need 1 map, however if you have lots of trees you will want to add multiple maps.
The map feature is like a module or component, you can insert as many components as you want, if you need multiple maps you go into editing mode by pressing the 'Edit Report' button, then select the Templates option (see image below) and there are a range of modules you can drop into your report including maps.

Of course you may sometimes choose not to use the ProofDocs map feature and use your CSV data in QGIS or an alternative mapping program and insert those maps into your report as per an image.
Each time you upload a ProofDocs form from your device, your raw data will be compiled into a spreadsheet and emailed to you. You may not need this file however it can be useful for more complex data management, mapping, sorting and searching. Having this file acts as an additional backup so that you always have a copy of all your original raw data.
This file will contain all the fields you collected such as species and tree condition as well as the meta data related to the form such as times and dates.
It is this raw tree data that can easily be imported into mapping GIS software to produce more detailed map images, or given to Government or large clients who will import it into their own mapping and asset management databases.
Within the ProofDocs report builder you can use the 'Raw Report data' function to edit content as it goes into your report:
- exit the editing mode
- use the Raw Report Data section to 'Edit'
- find the text you want to change and change it
- go back and 'Edit Report'
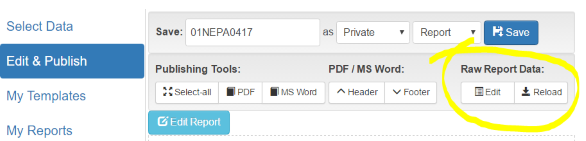
This function allows you to change the content as it is entered into your arborist report, it DOES NOT change the underlying original data on your phone, on the server or in your inbox, it's simply a shortcut to enable quick editing for the printed report.
(DO NOT Uninstall ProofSafe)
Your data is secure however if for any reason you think you have lost it, make sure you do not uninstall the ProofSafe App from your device until the issue is sorted. There are a number of features built in to avoid the risk of misplacing data however if you remove the app from your device you will lose your data unless you have successfully uploaded to the server. As with any issue if you can't find an answer here, contact us immediately.
You may notice there are not many 'save' buttons or popups in the ProofSafe app, this is because we make the assumption that if you entered some data, then you probably want to keep it, so we've skipped all the save buttons and just gone ahead and saved. If you move to the next question or exit out of a page, your data is saved on your device.
Once you upload to the server your files are backed up; your data is on your device and the servers and in your inbox, however prior to this it's only on your phone or device, therefore make sure you upload promptly. It would be sad to see your data go through a chipper or to the bottom of a lake before you have uploaded!
Dynamic fields
Dynamic fields are accessed using the button at the top of each text box you create in your templates. fields such as address, phone number, date, name can be automatically inserted anywhere into a document.
Address
The address dynamic field is automatically broken into segments, usually number and street followed by suburb etc. Sometimes this may not work depending on the complexity of the address in which case you will need to manually add the address.
If you type an address into your form (on the App) and Google does not recognise that address it will either return nothing to your report or the letters 'asd' will be inserted, you will need to fix this in the report manually.
ProofDocs storage
ProofDocs is for building reports, it's not a filing cabinet. Once you have finalised your report save a Word and PDF copy because it won't be saved within ProofDocs much past a few months.
Your data may be saved in ProofSafe indefinitely depending on your account and settings but we always recommend you keep copies on your own system.
This search tool will search the ProofDocs site and identify applicable pages.
If you want to search for text and it's exact location within a given page use Ctrl F (windows) or Command F (Mac) to use your browsers' search function.